What is this?
During custom theme development several features were added to this site that are custom to the VGL.
What custom features have been developed and made available?
- The ability to add an inline PDF viewer so that users can view a PDF document without downloading and opening it separately.
- The ability to open images in a lightbox(a pop up that shows a full-size image).
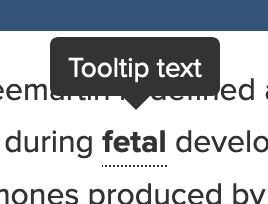
- The ability to add a tooltip (Text that appears above something describing what it is) to text using the text editor.
- A set of classes for the Meet the Team page to prevent the biography text from wrapping under the portrait image.
- The ability to wrap a bulleted list around images right-aligned on the page.
Add a PDF Viewer
To implement:
- Create or Edit a content type that has a document field(Such as Basic Page).
- Add a PDF to the "Documents" field.
- Save your content.
- You can now get the link to PDF by clicking on it, hovering your cursor over it, or using your browsers code inspector. You just need the relative path (example: /sites/g/files/dgvnsk15116/files/files/page/IrishSetter20190325.pdf).
- Now edit your page.
- The text area you want to add the inline PDF to needs to have the "Text format" set to "VGL Format".
- Now click the editor button "Source" to edit the text as code.
- Add your custom code to create a PDF viewer window, "<div class="add-pdf" data-pdf-path="/sites/g/files/dgvnsk15116/files/files/page/IrishSetter20190325.pdf">See our <a href="/sites/g/files/dgvnsk15116/files/files/page/IrishSetter20190325.pdf">PDF</a></div>"
- Make sure that you use a <div>
- Add a class of "add-pdf" to the div
- Add a data attribute of "data-pdf-path" to the div and set it equal to the relative URL of your file
- Anything can go inside the div, but we suggest a link to the PDF, just in case the PDF viewer cannot load for some reason
- Save your work.
Add a Lightbox
A lightbox is an image or a set of images that can be opened when clicked on in a window inside the browser window. If you have multiple images, you can click through the collection with the left and right navigational arrows, and you should always have the option to close the window with the X.
To implement:
- Edit a page or type of content.
- The text area you want to add the lightbox to needs to have the "Text format" set to "VGL Format".
- Now click the editor button "Source" to edit the text as code.
- Find your image, it should look like this/:
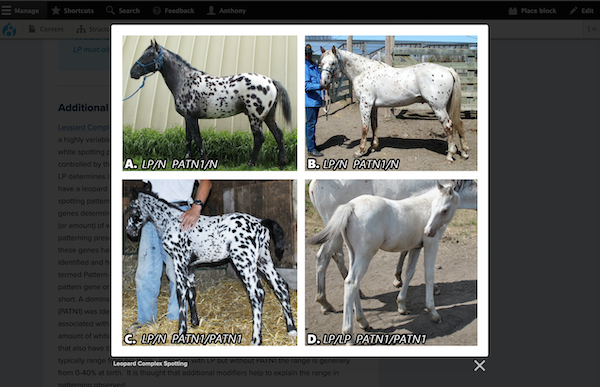
- <img alt="Figure showing four horses with LP and PATN1" data-align="right" data-caption="Phenotypes and corresponding genotypes of four different horses with leopard complex spotting patterns modified by PATN1. Image credits: A-C by Sheila Archer, D by Joanne Greenwood" data-entity-type="file" data-entity-uuid="886e8e04-8600-4e2a-a443-8ea8104f614f" height="378" src="/sites/g/files/dgvnsk15116/files/inline-images/PATN1-and-LP-Figure.jpg" width="430" />
- Wrap the image in a link tag (example: <a>Image Here</a>).
- Give it some custom attributes:
- data-lightbox - This attribute will tell the theme that you want to use a lightbox and if multiple images on a page share this attribute, then they will all be available as a collection that the user can navigate through. Even if this is just one image, give it a unique identifier here
- data-title - This attribute assigns the text that will be below the image in the lightbox.
- href - This is the image to open in the lightbox (Use a relative url)
- Example of this all together: <a data-lightbox="horse-1" data-title="Leopard Complex Spotting" href="/sites/g/files/dgvnsk15116/files/inline-images/PATN1-and-LP-Figure.jpg"><img alt="Figure showing four horses with LP and PATN1" data-align="right" data-caption="Phenotypes and corresponding genotypes of four different horses with leopard complex spotting patterns modified by PATN1. Image credits: A-C by Sheila Archer, D by Joanne Greenwood" data-entity-type="file" data-entity-uuid="886e8e04-8600-4e2a-a443-8ea8104f614f" height="378" src="/sites/g/files/dgvnsk15116/files/inline-images/PATN1-and-LP-Figure.jpg" width="430" /></a>
- Save your work.
* Example is in the Additional Details area.
Add a Tooltip
A tooltip is a little bubble that pops up when you hover over something.
To implement:
- Edit a page or type of content.
- The text area you want to add the lightbox to needs to have the "Text format" set to "VGL Format".
- Now click the editor button "Source" to edit the text as code.
- Wrap the text that you want to add the tooltip to in a span tag
- example: <span class="vgl-tooltip" data-tippy-content="The text to appear in the tooltip">The text to add the tooltip to</span>
- Notice the class "vgl-tooltip", this implements the tooltip.
- Also notice the "data-tippy-content" attribute. This is where you put the text you want to appear in the tooltip when it pops up.
- Save your work and test.
Format the Meet the Team page to prevent text from wrapping
HTML and CSS have been added to your site's Manage » Configure » Content Authoring » Text Formats section to allow you to manually embed classes created from the SiteFarm PatternLab library. The code aligns the image on the left and the biography on the right side, and prevents the text from wrapping beneath the image.
To implement:
- Edit a page or type of content.
- Click the editor button "Source" to edit the text as code.
- Your content has been customized to allow the portrait image to sit to the left of the biography text, preventing that text from wrapping beneath the image. Here is the code being used:
<div class="o-media">
<div class="o-media__figure">{{ image information here }}</div>
<div class="o-media__body">{{ body text here }}</div>
</div> - To add a new person, it might be easiest to upload the image and then paste or type in the text, then go to the Source code to apply the classes outlined above. Alternately, you can copy an existing person's entry and replace the image and text.
- Save your work and test.
Wrap bulleted lists around a right-aligned image
HTML and CSS have been added to your site's Manage » Configure » Content Authoring » Text Formats section and your CSS Editor (Manage » Appearance » Settings » Custom CSS) to allow you to insert a CSS class into the page.
To implement:
- Edit a page or type of content.
- Click the editor button "Source" to edit the text as code.
- Locate the <ul> tag at the very beginning of the lists of items.
- Update the tag text to <ul class="inline-list">.
- Save your work and test.
Additional Developer Information and Documentation
- Lightbox implemented using https://lokeshdhakar.com/projects/lightbox2/
- Tooltip implemented using https://atomiks.github.io/tippyjs/
- PDF viewer implemented using https://pdfobject.com/
- Tags and classes added to Text formats and editors
- List class to wrap around images added to Custom CSS